Birthdays are all about presents, cake and celebrating with friends/family, so getting the right birthday cake can make all the difference. I know that on the run up to my daughter's third birthday party recently all she spoke about what her birthday cake and the desire for it to be an ice-cream (she had an ice-cream themed birthday party). After looking around at the major supermarkets, as well as Waitrose, Marks & Spencer and Ocado it became evident that there just weren't any ice-cream cakes out there. The other issue I came across was that Isabella doesn't have chocolate, which made about 80% of the cakes unsuitable. In an attempt not to let her down in the cake department I set about thinking of ways to create my own 'masterpiece'.

Time was limited, as I was already preparing all of the party food by myself while looking after my daughter's, so the answer had to be either 'make ahead of time' or quick to do. Most of the UK supermarkets offer at least one 'Decorate your own' cake, which is usually vanilla sponge with jam and covered in white fondant icing. This seemed like the perfect blank canvas to start getting creative, so I picked up this square one from Waitrose (£7) and this Star Maderia Cake from Morrisons (£6) (they do also do a plain one, but it wasn't available in our local store). Altogether they cost £13, which isn't too bad for what will become a two tier cake, infact Waitrose sell a two-tier fondant madeira cake and it is £129 so it's quite a saving!

This way of transforming a shop bought cake into a masterpiece could be used for a birthday, but also as an affordable wedding cake option. I transformed the cakes into an ice-cream birthday cake, but you could paint on any design and top with a 'Mr & Mrs' cake topper instead of 'Three'. The basics are the same and then you can let your imagination run wild depending on who and what the cake is being created for.
What you'll need:
Food Colouring - I used this Wilton Icing Colours
Clear Alcohol or Clear Vanilla Essence
New Paintbrushes
Mini Party Rings
Mini Meringues
White Fondant Icing (to practise on)
Iced Gems
Edible Glue (or thick white decorating icing) - I used this one from Hobbycraft
Step 1
My first job was to take the star cake back to being a plain cake, so I unstuck the ribbon it came with and gently eased off the stars with a sharp knife. There were marks left where the icing that stuck the stars down had been, but we'll cover those up later with decorations.


Step 2
The main decoration on this cake is the watercolour edible painintg, which is created by mixing food colouring with a very small amount of clear alcohol (like vodka) or vanilla essence. I would recommend using the Wiltons icing colours because they're strong and gel, so you can create the right consistency for painting on the detail later. Before painting directly onto the cakes I practised by rolling out a small amount of the white fondant to practice on. I wanted a washed watercolour affect across the whole cake and then more detailed ice-creams around the edges. For the watercolour wash I mixed a small amount of food colouring with the clear liquid and just kept painting it onto the icing until I was happy with the results. It isn't an exact art, but it is best to add a tiny amount of food colouring at a time because you want the colour to be quite faint. To practice the more detailed painted on pictures I got a finer paintbrush wet with the clear liquid and then dipped it directly into the food colouring. It wasn't diluted at all because otherwise it was too difficult to paint on any detail.


Step 3
Once you are happy with your colours you can start painting your cakes. As they aren't kept in an airtight box from the supermarket and they come with a long date life this part can be done in advance of an event. It does take a day or so to dry properly, so it is worth painting a few days ahead of your event. I painted blue all over the bottom tier and pink over the top tier, but you could of course keep the colours the same. To create the almost ombre finish around the edge I dipped a large paintbrush into the food colouring and very lightly swept it over the edges of the cake. I then used the watercolour wash to blend the two together.


Step 4
Once you have left the watercolour wash layer to dry then you can paint on the details. I went for an ice-cream, strawberry and ice lolly pattern around the edges of both cakes. This did take a while, as I'm sure you can imagine, so it is worth making sure you have enough time to complete it. You don't really want to start and stop because the edible paint will dry out and the colours may therefore not be consistent. As I mentioned earlier, I decanted some of the food colouring onto a plate and then mixed it around with only the liquid retained in the paintbrush after being dipped into the clear liquid (either vodka or vanilla essence). You need this paint to be more opaque and 'thick', so that it doesn't run when you paint on the ice-creams. Once you're happy with your edible paint you can get painting!


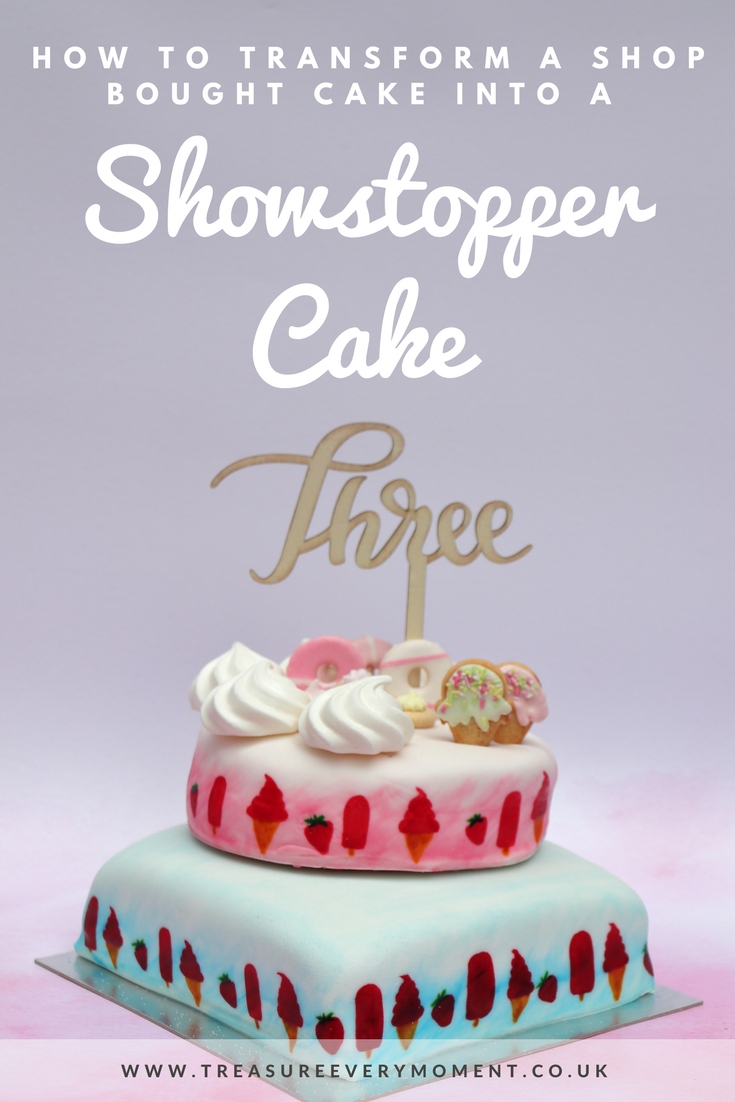
Step 5
Once everything is painted and you're happy with the results then you need to let it dry completely, which can take a couple of days. I just popped them back in their supermarket boxes until I was ready to assemble the cake on the day of the party. To assemble the two-tier cake the first thing you'll need to do is to very carefully run a large sharp knife under the smaller round cake, so that it is removed from the board. Next, push in four straws into the bottom square cake in the area you want the top tier to go. Then snip off the rest of the straw that is poking out the top of the bottom cake. These will help support the cake and ensure everything is secure. Squeeze a small amount of white decorating icing or edible glue into the middle of where the top tier is going on the bottom cake and then carefully place the top tier on, checking that it is on evenly. The last job is to decorate the top and to cover those marks left by removing the stars. I fixed on some shop bought mini meringues with white decorating icing and used edible glue to stick the party rings and iced gems in place. The 'Three' is actually from a set of Ginger Ray Boho Wooden Table Numbers* from Hobbycraft (£17 for numbers 1-12) and I wrapped the stick in clingfilm so that it was safe to be in the cake. The mini ice-cream biscuits I made for the party and there will be a tutorial coming for those soon.


I'm pleased to report that Isabella was very excited about her birthday cake, which made all of the time and effort worth it. It's a very affordable (this two-tier cake cost around £15 to make) way to create a completely unique cake for any special occasion.
Have you ever transformed a shop bought cake?
Feel free to leave a comment - I love reading every single one :)
Helen x
Wow! I can't believe you did all this from what you started with! Amazing works, the sides look especially good!
ReplyDeleteThis makes me so hungry! I love making cakes but I'm not very good at it, I just love decorating them, so this is a good idea I've never thought of! I especially love the use of the party rings and ice gems!
ReplyDeleteMeg
www.bekindtoyourmind.org
This looks amazing I would never think to buy a plain cake and decorate it myself - such a great idea! (www.memeandharri.com)
ReplyDeleteSuch a great idea to make it more personal! I love your decoration too. Beautiful!
ReplyDeleteIt turned out amazing! I just love the creativity that you put into that cake. It's perfect!
ReplyDeleteWe love how you've pimped up this cake! It looks awesome - next time we're customising our cakes!
ReplyDeleteThis looks brilliant . I always said I would do this for our wedding cake as it will be so much cheaper!! Kira
ReplyDeleteWow, you made it into a masterpiece - it looks absolutely incredible!
ReplyDeleteThis looks absolutely amazing and is such a creative idea! It must have been so much fun to do too!
ReplyDeleteThis is absolutely amazing! Definitely changed my mind now from ordering from a baker! Going to try and do this with Freddie's birthday cake!
ReplyDeleteWhat a fabulous idea. I have a friend who always makes mine but this looks amazing and much cheaper too
ReplyDeleteOh wow this looks absolutely amazing! And so innovative too
ReplyDeleteThis cake looks amazing! We are having a BBQ the day after our wedding in August and we need a cake so I have been trying to work out how to make a fancy cake but not too expensive.
ReplyDeleteI absolutely love your creativity, I have never thought about up cycling a store bought cake, this looks absolutely delicious and glad she liked it
ReplyDeleteThis is a fantastic idea - I am no good at baking so it is perfect for me! Well done! Kaz x
ReplyDeleteWhat a great idea, I never have the time to bake at home and always buy in but never thought of making them my own like this
ReplyDelete