Our children grow up way too fast; the saying 'the days are long, but the years are short' couldn't be more true when it comes to life as a parent. The years fly by and before you know it you're baby isn't a baby anymore. Capturing those years can be so special, especially to look back on altogether in years to come. The traditional 'first day of school' and 'last day of school' comparison photographs are such a perfect way to see quite how much our children grow up within a year of school. As my eldest child finishes her first year at primary school I really wanted to capture her growth throughout primary school in a slightly different way.
On Facebook I came across the idea of personalising a t-shirt with 'Class of....' and then the year your child would finish education at 18 years old. I loved the idea instantly, but practically I wasn't sure I'd be able to remember to take the photograph every year for the next fourteen years! I therefore thought I'd make t-shirts for the end of primary school and if I keep up with those photographs then I'll make some new ones to go through secondary school.

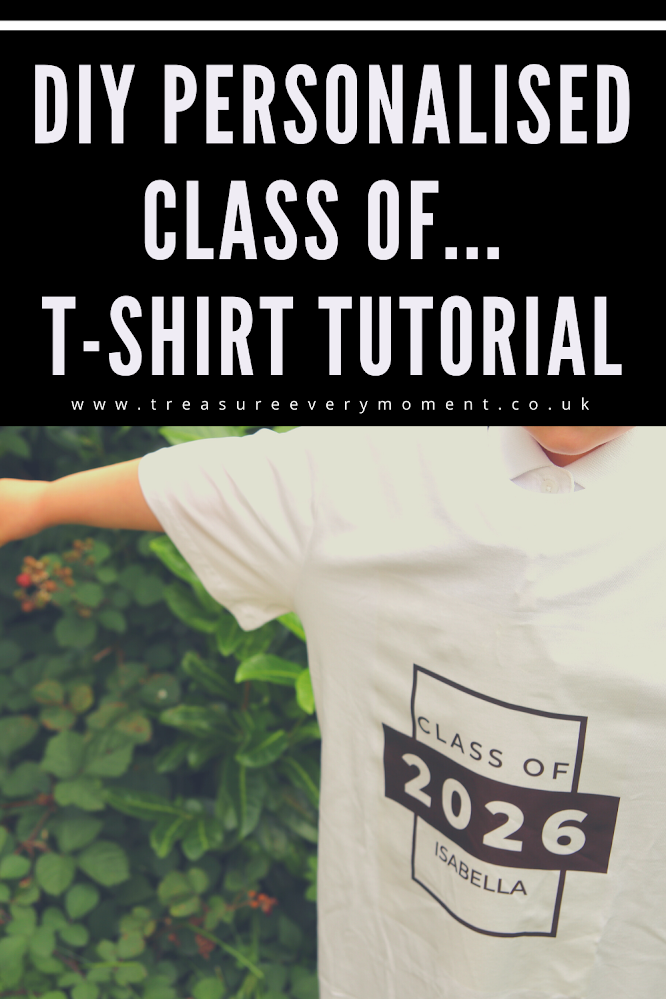
Creating these DIY Class of... T-Shirts was really affordable with a little shopping around and surprisingly easy to do too. The T-Shirt transfer sheets can be quite expensive, however I found A4 Transfer Sheets from PoundToy for £1.50. You do need to have a inkjet printer to make these t-shirts, but other than that the only other thing you'll need is a white (or whatever colour you'd like) t-shirt. I looked around online and found these white t-shirts for £2.99 each. You'll need to find a t-shirt that will fit your child when they are at the end of Year 6; I went for 12-14 years old, which will probably still be really big, but I'd rather it fit than not fit and then have to miss the final year photograph!

What you'll need:
Canva (the free version)
Inkjet Printer
T-Shirt Transfers
White T-Shirt (in a size to fit your child when they're in Year 6)
Iron
What to do:
1) Firstly, you'll need to design the image to transfer onto the t-shirt. I did this on Canva, which is free to use and has endless options for the design including templates, shapes and a rainbow of colours. I selected 'T-Shirt', then searched 'birthday' to find the template I wanted to use, but you can select whichever catches your eye. The original template I selected said 'Born 2002', so I edited it to say 'Class of 2026 Isabella' and changed the colours to black and white, so that they would really stand out on the white t-shirt.
2) Once you are happy with your design you'll need to download it as a PNG (top right hand corner of the screen), then open the file as an image.
3) Click on 'Edit', select 'Crop & Rotate' and then 'Flip', so that the design becomes a mirror image.

4) Place your t-shirt transfer paper into your printer (ensuring it is the right way around - if you're not sure it may be a good idea to print a trial run on paper first) and print following the instructions of your t-shirt transfers carefully.
5) Leave the printed images to dry for at least 30 minutes.
6) To transfer the image onto the t-shirt you'll again need to follow the instructions specific to your transfer paper, but this is what I needed to do. Place the ironed white t-shirt onto the ironing board, put the transfer paper writing side down in the centre of the t-shirt and heat your iron to maximum. Do not use steam.


7) Starting in the top right hand corner of the transfer sheet hold the iron firmly down for 20 seconds, then move along to the top left hand corner, holding for 20 second each time. Repeat until you have covered the whole sheet, concentrating on making sure the edges have been heated. Go over the whole sheet in circular motions for around 10 seconds.
8) Leave to cool for a few seconds and then peel off the backing sheet. I found that if the image started to lift off the t-shirt while peeling you can just place the backing sheet down and iron over it again for a few seconds to heat the glue up a bit more. Never let the iron touch the image directly though.


9) Once the whole backing sheet is peeled off you're done! Allow to cool and then take a photograph of your child wearing it each year until they're in either Year 6 or Year 13/College. This could either be done at the start of the school year or the end, whichever you think you're most likely to remember to do.


Did/do you do anything to capture how much your children grow each year?
Feel free to leave a comment - I love reading every single one :)
Helen x
I love the design of this leavers t-shirt it looks very modern. My daughter got a leavers hoodies when she left year 6 but this is much nicer.
ReplyDeleteThis is a lovely idea. I like how easy it is to do as well.
ReplyDeleteOh this is such a cool design and such a good way to commemorate the end of the year. Is there anything you can't do on Canva!
ReplyDeleteWhat a great idea! I have a book which I’ve asked all their teachers and carers to complete with a message. My littlest starts school this week so may do this for him
ReplyDeleteExcellent post. I really enjoy reading and also appreciate your work.how to make a custom shirt This concept is a good way to enhance knowledge. Keep sharing this kind of articles, Thank you.
ReplyDelete